
Iceland is a dream for travel photographers. It has stunning landscapes made of volcanic and glacial terrains. This mix offers many photo opportunities.
A 7-day itinerary lets you see the top spots and take amazing photos. You’ll see waterfalls, black sand beaches, glaciers, and hot springs. It’s a photographer’s dream.
Start a journey to see the best of Iceland photography. Follow a travel photography plan to make your trip unforgettable.
Key Takeaways
- Discover the best locations for capturing Iceland’s landscapes.
- Learn how to make the most of your 7-day travel photography itinerary.
- Understand the best times for photography in Iceland’s unique environments.
- Explore tips for capturing stunning images in Iceland’s diverse terrains.
- Plan your trip to Iceland with a focus on photography opportunities.
Preparing for Your Iceland Photography Adventure
Getting ready for your Iceland photography trip means choosing the right camera gear. You’ll need to protect your equipment from the harsh weather. This way, you can take amazing photos of the landscapes.

Essential Camera Gear for Iceland
Iceland’s landscapes, from waterfalls to glaciers, need the right camera. A DSLR or mirrorless camera with different lenses is best. This setup lets you capture the varied scenery.
Lenses and Filters for Landscape Photography
A wide-angle lens (10-22mm) is great for Iceland’s big views. Neutral density (ND) filters help with bright light. A polarizing filter cuts glare and boosts colors.
Tripods and Stabilization Equipment
A strong tripod is key for low light and long exposures. It’s perfect for the Northern Lights or silky waterfalls. Look for a tripod with a ballhead for easy adjustments and weights for stability in wind.
Weather Considerations and Protection
Iceland’s weather can be tough, with sudden rain, strong winds, and cold. Keeping your camera gear safe is important. This way, you can keep taking great photos.
Waterproofing Your Equipment
Use a rain cover or waterproof housing to shield your camera from rain and snow. Clean your gear often to stop moisture buildup.
Dealing with Wind and Extreme Conditions
Use a tripod with weights to keep your camera steady in windy weather. Be ready to change your camera settings fast when the light changes. Keep your equipment clean and dry.
Choosing the right camera gear and protecting it from Iceland’s weather will prepare you. You’ll be ready to capture the stunning landscapes and unique features of the country.
Best Time to Visit Iceland for Photography
The best time to visit Iceland for photography depends on the lighting and natural wonders you want to see. The country’s landscapes are stunning, thanks to the changing light throughout the year.
Seasonal Lighting Conditions
Iceland’s light changes a lot between summer and winter. Summer has almost 24 hours of daylight, while winter has shorter days.
Summer’s Midnight Sun
The Midnight Sun in summer offers soft, diffused light. This light is perfect for landscapes without harsh shadows. It lets you take photos for hours, showing off Iceland’s beauty in new ways.
Winter’s Golden Hours
Winter has shorter days with golden hours. These hours have warm, soft light, great for dramatic landscapes. The low sun adds depth to your photos.

Northern Lights vs. Midnight Sun
Iceland is famous for the Northern Lights and the Midnight Sun. The Northern Lights are seen from September to April. The Midnight Sun is in the summer.
Aurora Borealis Photography Planning
To see the Northern Lights, plan your visit during peak season. Be ready for late-night shoots. A tripod and camera that works well in low light are key for clear Aurora photos.
Making the Most of 24-Hour Daylight
In summer, the 24-hour daylight means you can shoot anytime. You can take photos at any hour, using the soft light for unique shots.
As a famous photographer once said,
“The key to capturing Iceland’s beauty lies in understanding and adapting to its ever-changing light.”
Photography Itinerary: 7 Days in Iceland – Overview
Iceland is known for its unique landscapes and tough weather. Planning a 7-day photography trip here is key to capturing its beauty. This guide will help you create a great itinerary.
The ring road is a great way to see Iceland’s varied landscapes. When planning your trip, think about the season and weather. This will help you know if roads will be open.
Route Planning and Driving Tips
Good route planning is essential to see the best spots without wasting time. Iceland’s roads can be tough, so always check the weather and road conditions each day.
Driving in Iceland needs care, as the weather can change fast. Make sure your car is ready for the terrain and weather.
- Always check the latest weather forecasts.
- Consider renting a 4×4 vehicle for better traction.
- Keep your gas tank full to avoid running low in remote areas.
Accommodation Recommendations
Finding the right accommodation is key for a comfortable trip. Iceland has many options, from budget-friendly guesthouses to luxury hotels.
Book your stay early, as places fill up fast, even more so during peak seasons. Start in Reykjavik to get used to the local vibe.

Day 1-2: Reykjavik, Blue Lagoon, and The Golden Circle
Starting your Icelandic adventure, the first two days are filled with amazing sights. You’ll explore Reykjavik, the Blue Lagoon, and the Golden Circle. These places offer diverse landscapes and cultural experiences that will inspire your photography.

Capturing Reykjavik’s Colorful Architecture
Reykjavik is known for its colorful buildings. It’s a great place for urban photography. To capture the city’s essence, focus on:
- The contrasting colors of the buildings
- The quirky street art that dots the city
- The interplay of light and shadow on the facades
Try different angles and compositions to show the city’s charm.
Blue Lagoon Photography Tips
The Blue Lagoon is famous for its milky-blue waters and silica mud. For great shots, consider:
- Capturing the mist rising from the water at dawn or dusk
- Using a macro lens to detail the silica mud on your skin
- Experimenting with reflections on the water’s surface
Thingvellir National Park Compositions
Thingvellir National Park is a UNESCO World Heritage Site. It’s known for its historical significance and dramatic landscapes. When composing your shots, look for:
- The rift between the North American and Eurasian tectonic plates
- The dramatic lighting that filters through the sparse vegetation
- The historical sites that tell the story of Iceland’s past
Geysir, Strokkur, and Gullfoss Waterfall
The Golden Circle includes Geysir, Strokkur, and Gullfoss Waterfall. For dynamic shots:
Action Shots of Geysers
Use a fast shutter speed to freeze Strokkur’s eruption. Anticipate the eruption for the perfect shot.
Long Exposure Waterfall Techniques
For Gullfoss, a long exposure creates a silky effect on the water. Use a neutral density filter to achieve the desired exposure time.
These first two days offer a rich mix of photography opportunities. From Reykjavik’s urban landscapes to the Golden Circle’s natural wonders, each location presents unique challenges and rewards. Your photography journey starts with a bang.
Day 3-4: South Coast to Jökulsárlón
The South Coast of Iceland is a dream for photographers. It has waterfalls, black sand beaches, and glacial lagoons. Days 3 and 4 offer many chances to capture the country’s beauty.

Seljalandsfoss and Skógafoss Waterfalls
Seljalandsfoss and Skógafoss are two famous waterfalls in Iceland. Seljalandsfoss lets you take photos from behind the waterfall. This gives you a unique view.
Behind-the-Waterfall Perspectives
Walking behind Seljalandsfoss gives you a special view. The waterfall surrounds you, making for amazing photos.
Rainbow Capturing Techniques
Look for rainbows at these waterfalls in the morning or late afternoon. Use a polarizing filter to make the rainbow stand out against the mist.
Black Sand Beaches at Vik
Vik’s black sand beaches show off Iceland’s unique beauty. The dark sand, ice, and ocean make for stunning photos.
Jökulsárlón Glacier Lagoon
Jökulsárlón Glacier Lagoon is stunning. It’s filled with floating icebergs. You can get close to them by boat or from the shore, with mountains in the background.
Diamond Beach Ice Formations
Diamond Beach is always changing. The ice against the black sand and ocean is dramatic.
Sunrise and Sunset Opportunities
Visit Diamond Beach at sunrise or sunset for the best photos. The golden light makes the ice and landscape look even more beautiful.
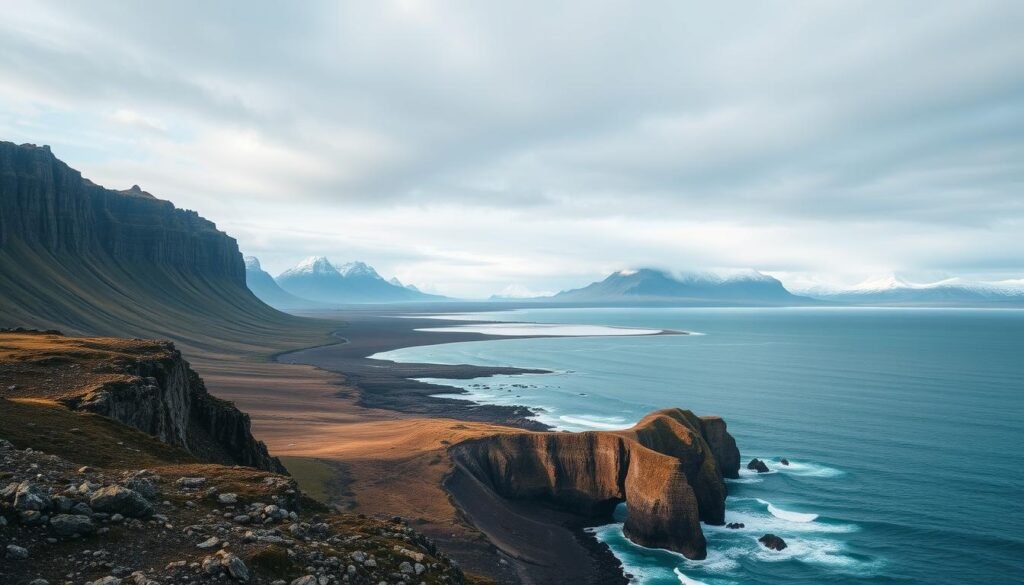
Day 5: East Fjords and Northern Landscapes
Day 5 takes us to the East Fjords, where the scenery is breathtaking. You’ll see calm fjords and towering mountains. It’s a paradise for photographers, with its green landscapes and high peaks.

Dramatic Fjord Photography
The East Fjords are perfect for dramatic photos. To capture their beauty, use the natural scenery to create stunning shots.
Using Leading Lines in Fjord Compositions
Leading lines are key in fjord photography. Look for shorelines, roads, and water patterns to guide the viewer’s eye.
Capturing Scale and Depth
To show the fjords’ vastness, include something in the foreground. A boat, person, or vehicle adds scale and depth to your photos.
Hidden Waterfalls and Landscapes
The East Fjords also hide many waterfalls and landscapes. Exploring these spots can reveal unique photo opportunities.
Off-the-Beaten-Path Photo Locations
Discover secluded waterfalls and valleys in less-known areas. These spots offer a peaceful atmosphere, ideal for capturing Iceland’s beauty.
| Location | Photography Tip | Best Time |
|---|---|---|
| Fjord Shoreline | Use leading lines | Early Morning |
| Hidden Waterfalls | Capture mist and water flow | Afternoon |
| Mountain Peaks | Emphasize scale and depth | Golden Hour |
Day 6: Myvatn and Northern Iceland
On the sixth day of your Icelandic adventure, you’ll explore Myvatn and northern Iceland. This area is famous for its unique landscapes, powerful waterfalls, and natural beauty. It’s a paradise for photographers.
Geothermal Landscapes
The Myvatn area is known for its geothermal landscapes. You’ll see bubbling mud pools, fumaroles, and vibrant earth tones. Focus on the color contrasts between the earthy hues and the steam.
Color Contrasts in Geothermal Areas
To highlight the color contrasts, adjust your camera settings. Use a polarizing filter to reduce glare and make colors pop. This will make your photos more stunning.

Dettifoss and Godafoss Waterfalls
No trip to northern Iceland is complete without seeing its waterfalls. Dettifoss and Godafoss are must-see spots for photographers.
Capturing Europe’s Most Powerful Waterfall
For Dettifoss, try a slow shutter speed to show the water’s power and movement. A tripod is key for stable shots during longer exposures.
Volcanic Formations
Myvatn is also known for its volcanic formations. You’ll see pseudocraters and volcanic craters. These offer a peek into the area’s volcanic past and great photo opportunities.
Exploring Myvatn and northern Iceland lets you capture diverse landscapes. From geothermal areas to waterfalls and volcanic formations, it’s a memorable sixth day on your Icelandic photography journey.
Day 7: Snæfellsnes Peninsula
On Day 7, explore the Snæfellsnes Peninsula. It’s filled with Iceland’s most stunning views. You’ll see everything from volcanic mountains to beautiful coastlines.

Kirkjufell Mountain Compositions
Kirkjufell Mountain is a favorite among photographers. To capture its beauty, try these tips:
Classic Foreground-Background Techniques
Make the mountain the main focus. Add interesting foregrounds like rocks or water to deepen your shot.
Night Photography at Iceland’s Most Photographed Mountain
For night shots, aim for the Northern Lights or midnight sun. A sturdy tripod and long exposure are key.
Coastal and Volcanic Features
The Snæfellsnes Peninsula has more than Kirkjufell. It’s home to stunning coastal and volcanic landscapes perfect for photos.
Black Churches and Fishing Villages
Check out the black churches and fishing villages like Arnarstapi and Hellnar. They offer a peek into Icelandic culture and are great subjects for photos.
Lava Field Photography
Discover the lava fields and their unique textures and patterns. Shooting during early morning or late evening adds drama to your photos.
| Location | Best Time to Shoot | Tips |
|---|---|---|
| Kirkjufell Mountain | Golden Hour or Night | Use a tripod for stability |
| Black Churches | Overcast or Golden Hour | Capture the contrast between the church and the surroundings |
| Lava Fields | Early Morning or Late Evening | Highlight the textures using side lighting |
Advanced Photography Techniques for Iceland
Photographing Iceland’s stunning vistas needs both technical skill and creative vision. To capture the country’s breathtaking landscapes, photographers can use several advanced techniques. These techniques enhance their images.
Long Exposure Water and Clouds
Long exposure photography works well in Iceland. Waterfalls, rivers, and clouds create dynamic scenes. A Neutral Density (ND) filter helps take longer exposures even in bright light.
ND Filter Techniques
ND filters let less light into the lens, allowing for slower shutter speeds. This is perfect for smoothing water and capturing cloud movements. For example, a 10-stop ND filter can turn a busy waterfall into a serene, misty veil.

Northern Lights Photography
Capturing the Northern Lights in Iceland is exciting. To photograph the Aurora well, adjust your camera settings for low light.
Camera Settings for Aurora
Use a wide-angle lens, set a low ISO (800-1600), and a slow shutter speed (10-30 seconds) to capture the Northern Lights. A sturdy tripod is key to prevent camera shake.
| Camera Setting | Recommended Value |
|---|---|
| ISO | 800-1600 |
| Shutter Speed | 10-30 seconds |
| Aperture | f/2.8 or wider |
Panoramic Landscape Techniques
Creating panoramic images is a great way to show off Iceland’s vast and varied landscapes. By stitching multiple photos together, you can capture expansive vistas that draw viewers into the scene.
Stitching Methods for Wide Icelandic Vistas
To make a panoramic image, take multiple shots with overlapping frames. Use software like Adobe Lightroom or Photoshop to stitch these images together. This ensures a seamless blend of the frames.
By mastering these advanced photography techniques, you can improve your Iceland photography. You can capture the country’s unique beauty in compelling and creative ways.
Conclusion
With this 7-day Iceland photography itinerary, you’re set to capture the country’s stunning landscapes. From Reykjavik’s lively streets to Jökulsárlón Glacier Lagoon’s calm beauty, each spot offers a special photo chance.
When planning your trip, don’t forget to pack your camera gear and get ready for Iceland’s changing weather. With these tips, you’ll be all set for an amazing photography adventure in Iceland.
Whether you’re after the Northern Lights or the midnight sun, Iceland’s varied landscapes and lighting will test and inspire you. So, grab your camera and start an unforgettable photography journey through Iceland.